Wednesday, December 18, 2013

[Tutorial] Do You internal linking ? 6 benefits of internal linking in SEO

Each and every blogger is thinking about getting high reputation from both search engines as well as site visitors and so focusing on providing quality content. We all know content is king when it comes to SEO.
 
In addition to that internal linking is one of the main elements to be carried out in your SEO strategy. To drive traffic and to contribute equal value to your other pages you must use internal linking as part of your SEO strategy. Here we will discuss about internal links and the benefits of internal linking in SEO.

Related: Do follow and No follow links – The difference

What is internal linking?

Internal link is a normal hyperlink pointing from one page to other page within the same domain. Internal links are mostly used for navigational purpose. So let’s say we have a new blog post about embedding media files in wordpress. From there we are linking to another blog post that is embedding Google maps in wordpress in which both are related to wordpress. So what is the use and advantages of internal linking? Go read on….

Internal linking and benefits of internal linking in SEO

Related: SEO friendly URL structure | Canonical URL for SEO

6 Benefits of internal linking in SEO

After reading these 6 benefits of internal linking in SEO you will probably start internal linking as part of your SEO campaign.

1. Internal links are more user friendly – Anchor texts

Internal linking helps users to easily navigate within your site. By using proper anchor texts in your content you can show and send them to the most relevant pages that they are interested in. So if you’re writing an article about money making you can point your user from there to related categories and tags by using internal links.

2. Internal links pass the link juice

Both internal and external links should be equally given importance in SEO. External links are off page factor (backlinks) which gets you an authority from external source. While internal links helps in passing the link juice equally to other pages within your site. For example let’s say this page has 100 backlinks, so all the links in this page also will get some link juice.
Internal linking and benefits of internal linking in SEO

3.Internal links increases page views

Internal linking and benefits of internal linking in SEOAs it’s already mentioned above using proper anchor texts helps user to find more useful and related content in your site. This helps in increasing your site conversion rate. New visitors find it useful and can easily know your site structure and site links. More the people follow through your links increases in page views which help your site to boost your Alexa rank.
 
Related: Importance of page speed for SEO

4. Internal links helps in increasing PageRank

Internal linking and benefits of internal linking in SEODepending upon quality backlinks Google gives you PageRank for a page. A page with higher PageRank passes the link juice to other pages which are internally linked. Other pages will get better ranked in search engines due to the flow of link from the page that has higher PageRank. This in turn helps you to get organic search traffic.

5. Internal links reduces bounce rate

Advantages of internal linking in SEOThe percentage of visitors to your site who spending less time, that is just viewing one page and leaving your website immediately is known as bounce rate. Lower the bounce rate is the number of people staying so long by surfing within your site. So if you are linking to related posts then users will stay in your site for a long period of time which in turn reduces your sites bounce rate.
 
You can find out your websites bounce rate in Google analytics. Also see Google and Bing webmaster tools.

6. Better crawling and indexing

Benefits of internal linking in SEOCrawlers are smarter and designed in a way user thinks. These crawlers visit your site and pass through all the links and the pages get easily indexed. By internal linking they know you are pointing to other related content within your site that gives a bump to other pages.
 
Hope this article helped you with internal linking and the benefits of internal linking in SEO. So what are you waiting for? Go on start building internal links and remember to use internal links only to related content using rich anchor text.
[Continue reading...]

Tuesday, December 17, 2013

[Tutorial] How to display social widgets for Blogger

Displaying social widgets in a blog helps visitors to know that your blog has a profile on Facebook, Google+ and Twitter and so they get the latest updates straight from these social networks. This helps to build traffic to your blog.
 
In this post we will see how to get and display social widgets for Blogger. Facebook like box, Google+ badge and Twitter tweets for your Blogger blog.
 
Displaying Facebook like box, Google+ badge and Twitter tweets in Blogger is really easy. Just follow the steps.

How to display social widgets for Blogger

Ready to use code:
    Display social widgets for Blogger
  1. Login to blogger and go to your Dashboard >> layout
  2. Click Add a gadget, new pop up window opens
  3. Find out HTML/JavaScript and click the + button
  4. Paste the following i frame code in content area and save it.
<iframe src="//www.facebook.com/plugins/likebox.php?href=https%3A%2F%2Fwww.facebook.com%2Fblogtimenow&amp;width=200&amp;height=290&amp;colorscheme=light&amp;show_faces=true&amp;header=true&amp;stream=false&amp;show_border=true&amp;appId=109603472461097" scrolling="yes" frameborder="0" style="border:none; overflow:hidden; width:280px; height:290px;" allowtransparency="true"></iframe>

Now you can see the Facebook like box in your Blogger blog. Make sure you change the ID “blogtimenow” with your Facebook page ID.
Get your own code:

The above code fits perfectly for all the blogs if you want to add new features like streams, color, width and height then use this link Facebook like box and get your own code and paste it in HTML/JavaScript gadget and click save.

Social widgets for blogger

Related: Beginners guide to blogging with blogger


How to display Google+ badge in Blogger

Method – 1

Since Blogger is a free service owned by Google you can find Google+ badge in your gadget screen. Just enter your Google+ profile or page ID specify the size of the badge and pick the color. If the preview above is O.K then click save and refresh your blog to see the Google+ badge.

Social widgets for blogger

Method – 2

If you want the one like image above then click “add a gadget” and paste the following code in HTML/JavaScript content and click save. Make sure you change this ID “103580833761087808296” with your Google+ profile or page ID.

<!-- Place this tag where you want the widget to render. -->
<div class="g-page" data-width="280" data-href="//plus.google.com/103580833761087808296" data-rel="publisher"></div>

<!-- Place this tag after the last widget tag. -->
<script type="text/javascript">
  (function() {
    var po = document.createElement('script'); po.type = 'text/javascript'; po.async = true;
    po.src = 'https://apis.google.com/js/plusone.js';
    var s = document.getElementsByTagName('script')[0]; s.parentNode.insertBefore(po, s);
  })();
</script>
Method – 3

If you want new design like cover photo, tagline color theme then use this link Google+ badge create a new style >> copy the code and paste it in HTML/JavaScript gadget in your Blogger and save it.

How to display Twitter tweets in Blogger

Login to your Twitter account and go to Settings >> Widgets and create a new widget. Now configure your username, theme color, link color, width and click create widget. Now you will see a code below the preview, copy the code and paste it in HTML/JavaScript content and save.

Social widgets for blogger

It’s all done! You have displayed Facebook like box, Google+ badge and Twitter tweets to your Blogger blog. Now visitors can like your page, circle your page and see the latest tweets from your Blogger blog. Happy blogging!
[Continue reading...]

[Tutorial] How to creating pages and adding menu tabs in Blogger blog


Recently we posted an article on beginners guide to blogging with Blogger, but what you might ask is, haven’t you explained about creating pages and menu tabs on that beginners guide? Yes, we explained about creating pages but that is not much detailed. So in this post you will learn about creating pages and adding menu tabs in Blogger blog

Creating pages and adding menu tabs in Blogger

Creating pages in Blogger

Before learning about creating a page you must know the difference between posts and pages. To brief you about pages here is an example: “About us” page is all about your blog and about you and this is static. “Contact us” page is used to contact you and this is static. This post on “creating pages and adding menu tabs in Blogger blog” is informational and this is dynamic.
  1. Login to your Blogger dashboard and click pages next below to posts
  2. By default you will have a home page. Now create a new blank page
  3. Give a well suited page title and fill out your content
Creating pages and adding menu tabs in Blogger
As it’s mentioned above pages are static and you shouldn’t allow visitors to comment on pages
  1. On right side choose page settings >> options with gear symbol and select “Don’t allow” for comments
  2. Click “publish” once done. Now your page is live.
Creating pages and adding menu tabs in Blogger
By this way you can create as many pages you want. Now you don’t see the page links in your site and to show you need to add a menu tab.

Related: How to Display social widgets in Blogger

Adding menu tabs in Blogger

Menu tabs in Blogger helps you and users to easily navigate to the most resourceful pages in your blog and you can add pages, external links and labels as your menu tab.

Adding pages in Blogger menu tab

With above mentioned method we hope you successfully created your pages. To add your pages in menu go to dashboard >> pages and select show pages as “Top tabs” or “Side links” and click save arrangement. Now refresh your site you can see your page menus.
Creating pages and adding menu tabs in Blogger

Adding external link in Blogger menu tab

Go to Blogger dashboard >> Pages and drop down the new page and select web address. Enter the URL and give it a suitable title and save. With this option you can add external web links as well your site links (labels).
Creating pages and adding menu tabs in Blogger
Labels help you to organize your posts. For example in blogging label you can organize as many topics related to blogging so users find more useful in picking a topic. When you create a new post you can see labels at the right side, open and enter useful labels related to that post.

Creating pages and adding menu tabs in Blogger

To add labels in Blogger menu go to dashboard >> Layout and select add a gadget; a new window opens, now “select labels” option and select the major labels that you wish to show in your menu and click save. To place your labels in top menu just drag and drop in your Layout screen.
 
Creating pages and adding menu tabs in Blogger
 
Hope you now understood creating pages and adding menu tabs in Blogger blog. Share and comment your feedback’s. Subscribe to get the latest updates from Blog Time Now.
[Continue reading...]

Friday, December 6, 2013

[Tutorial] Setup nRelate related posts widget in Blogger


As you all know internal linking is more beneficial for the purpose of SEO, for you and your users. Adding related posts below your blog posts helps your site visitors as well as it helps in increasing your sites page views. So we made an article on adding related posts widget using LinkWithin. Recently we found out that LinkWithin site is down for maintenance. So here we will see how to setup nRelate related posts widget in Blogger.

nRelate related post is better than LinkWithin

Other than maintenance we found out more issues with LinkWithin and yes! nRelate related posts is best. First of all LinkWithin is not good for your SEO, we noticed that LinkWithin related posts are redirecting your site traffic to their site and directing back to your pages. You are passing your PageRank and link juice to LinkWithin from all your pages. Also there are few who mentioned that LinkWithin is showing unrelated posts. That’s why you need to switch to nRelate related posts widget where you can get more features than LinkWithin. So if you are using LinkWithin, better remove it and install nRelate related posts widget in your Blogger blog.

Features of nRelate:

  1. You can change your thumbnail size
  2. You have the option to choose from six different styles
  3. You can choose the relevancy level for related posts
  4. Join nRelate partner program and make money
  5. You can link default image for thumbnail
  6. You can display a maximum of 10 related posts in each blog pages
  7. nRelate works on wordpress, Blogger and Tumblr
  8. You can limit number of characters for title, excerpts and much more.

How to setup nRelate related posts in Blogger

  1. Go to nRelate registration page and create a new account. Once done activate in your mail and login to nRelate.
  2. After logging in click on install at the menu next to logo and select the platform that is Blogger.How to add nRelate related posts in Blogger
  3. Now at the next page enter your site URL and click submit
  4. Now you will have three options to choose from where you need to install the widget. Posts only, post and homepage and all pages.How to setup nRelate related posts widget in Blogger
  5. Select “posts only” option which takes you to next page to add page element.Adding nRelate related posts in Blogger
  6. Select your blog, change the title as “you might also like” or “Related posts” and click on add widget.
  7. Now it will take you to your blogs layout page. For best results drag the nRelate related posts widget from sidebar to below your posts and click save arrangement.
Go and check your blog where you have added related posts widget using nRelate. If you don’t like the look and feel or if you wish to modify based on your blogs appearance, then customize nRelate.

Customizing nRelate related posts widget

To customize nRelate related posts widget login to your nRelate account and at the top menu click on settings or go to settings here .

Customizing nRelate related posts widget in Blogger

In settings page you will have more option to modify the related posts widget.

Main settings: Here you can change the related posts format to text or thumbnails and you can choose your thumbnail size. Select from six different styles Trendland, Bloginity, LinkWithin, ToonBarn and Poloraid. You can change the related post title, set the relevancy to low, medium or high as you like and you have more options.

Removing nRelate logo – to remove nRelate logo from your page uncheck this box which says “support nRelate by displaying our logo”.

Removing nRelate logo from Blogger

The next thing you will see is advertising settings and partner settings in which you can display ads and related content from partner sites.

Make all changes to your nRelate related posts widget, click save and now check your blog. Your blog has a pretty looking related posts below each of your blog posts that is linking to relevant results.
[Continue reading...]

[Tutorial] How to add related posts to Blogger

How to add related posts to Blogger

Blogging is a one nice way to help peoples. Do you agree? Yes, then why don’t you help them more by showing and linking to one of your related posts? We once mentioned in one of our posts about internal linking that helps to keep your site visitors to stay for a long time. In this post we will see how to add related posts to Blogger.

You should not leave your blog visitors when they finish reading your post. Just add “You might also like” or “related posts” below every posts and have three to four linked pages with thumbnail images and send your visitors to related posts. By adding related posts below your Blogger posts you will get more page views. The more page views in more Alexa rank and more the rank is more you have the chance of making money. Let’s see how to get related posts below Blogger posts using related posts widget.
 
Related: Running widgets for Blogger – Social Trucks

How to add related posts to Blogger – Related posts widgets for Blogger

To add related posts in Blogger all you need is related posts widgets which you can create one at link within.
 
Go to linkwithin.com and you will see a space for get widget. Enter your email address, your blog URL, select the platform as Blogger. In width select whether you want 3,4 or 5 related posts for your Blogger to display. If your Blogger template is dark then check that box that says “my blog has a light text on dark background” and click Get widget.
 
Related posts for Blogger - Related post widgets

Related: Popup window for Blogger | Social widgets for Blogger

Now at the next page you will see install widget on Blogger, Click that link which says install widget.

Related posts for Blogger - Related posts widget

Now a new window opens like this. If you have more than one blogs then select one from that list where you wish to display related posts. In link title change the link within to Related Posts and click add widget.
 
How to add related posts to Blogger

In your Blogger layout settings you can see the related posts widget that gets added in your sidebar. For best results you must drag the related post widgets and drop it below your blog posts.
Now open one of your Blogger posts and you will see the related posts displayed with thumbnails.
 
Happy Blogging!
 
Update: Add nRelate related posts widget in Blogger where you will get more options and it is better than LinkWithin.

Hope you enjoyed this article on how to add related posts to Blogger. Share and subscribe to our blog posts.
[Continue reading...]

[Tutorial] WordPress VS Blogger VS Tumblr – Ultimate Comparison

 
Blogging is a best way to share your knowledge and ideas. If people don’t have the habit of writing blogs then there will no solution for most of the questions. Do you agree? Yes I do! If you are a new blogger choosing a best blogging platform that suits for you by your own is a bit difficult task. So for that I have compared the three most famed blogging platforms. Before reading this post read this comparison with self hosted blog vs third party blog hosting.

WordPress.com VS Blogger VS Tumblr

1. Creating your account

Creating an account in all these blogging platforms is really easy WordPress, Blogger, Tumblr. Since it is free you don’t see more fields during sign up process as you see in secure banking portals. Just your username, email, password and your blog address and you know blogger is owned by Google and so you can login with your Gmail account.

2. Creating a new blog

First of all you can manage multiple blogs in all these three blogging platforms with your single account.
 
WordPress.com – After you login you will see “my blogs” where you can create your new blog. Enter your blog address, blog name, set privacy and create your blog.
 
Blogger – Creating a new blog is easier than wordpress. You can see new blog once you login, just add your title, blog address and select your blog template. That’s it.
 
Tumblr – Creating a new blog in Tumblr is same as wordpress. You can find it in your dashboard

3. Creating a new post

Thanks for all the three services which has quick post option where you can easily create a new post. You can find this option once you login.
 
WordPress – You can choose any one of these options to post Text, photo, video, quote and link or you can make a detailed post from your dashboard
 
Wordpress.com vs Blogger vs Tumblr
 
Blogger – You get two options “compose” which is easy as WYSIWYG and another is “HTML”. You can add text, links, images and videos.
 
Wordpress.com vs Blogger vs Tumblr
 
Tumblr – It is has more advanced options than wordpress and blogger where you can add text, photo, link, quote, audio, video and chat
 
Wordpress.com vs Blogger vs Tumblr
 
[Note: You can upload your videos directly to Blogger and Tumblr but WordPress has only embed options since it allows only 3 GB of free space if you want more go for premium]

4. Managing your dashboard – WordPress vs Blogger vs Tumblr

Dashboard is just a back-end of your blog where you have the option to edit and manage your blog.
 
WordPress – You can find your dashboard by entering /wp-admin after your blog address. WordPress dashboard has more options where you can edit and manage your posts, media, links, pages, comments, appearance, users and your blog settings which is easy to use and navigate once you stick with it.
 
Blogger – WordPress and blogger dashboard navigation lies to left as a vertical line. You can see the overview of your blog stats; manage posts, pages, comments, adsense, layout, template and settings.
 
Tumblr – It is something little different when compared to wordpress and blogger. You can see your settings in top menu where you can edit your profile and blog.

5. Themes and Customizations – WordPress vs Blogger vs Tumblr

How beautiful is your blog? A blog should be pretty cool and easy to navigate for visitors. Let’s see which scores high in this.
WordPress – You can see a wide verity of free and premium themes in your dashboard > appearance. Just activate any themes you want. You can customize your theme background color, text color and widgets for more about wordpress customization this post can help you basic guide to wordpress in my point of view wordpress scores the best.
 
Blogger – It also has a wide range of themes you can find it in template and customize your theme. In layout settings you can edit the layout of your default theme and has more gadget which is known as widget in wordpress. Make use of this – Guide to blogging with blogger.
 
Tumblr – As I told you Tumblr dashboard is little different than blogger and wordpress and so you can find your theme customization options in your settings menu. It has some limited collection of themes but customizing your blog in Tumblr scores below WordPress and Blogger.
Wordpress.com vs Blogger vs Tumblr

6. Monetizing & Premium features

WordPress – With free features you get only 3 GB of space and if you want more space and more features you can go for premium. Dashboard > Store. WordPress.com doesn’t allow any third party ads to monetize your blog, but they have their own program known as WordAds and you need to request an invitation to afford it.
 
Blogger – When it comes to monetizing blogger scores the best among the three which you can easily have the option to integrate Google Adsense within your dashboard which is a most famous advertising program that most use to monetize their blog. None like others Blogger is completely free.
 
Tumblr – You can monetize any ad network in your Tumblr blog by using a HTML code and also you can find more premium themes in Tumblr.

Verdict: WordPress vs Blogger vs Tumblr

As a new blogger stick to any one of these and you will learn to use and manage your blog easily, but the pick is yours. All these three blogging platforms are equal to one way or another, but I suggest you to go for Blogger which you will find it easy to navigate in and around your blog and you can monetize your blog.
 
Why not wordpress.com? It gives only 3 GB free space and you cannot monetize with other ad networks
 
Why not Tumblr? Content and customization option is limited when compared to Blogger and WordPress.
 
Share and comment your ideas.
[Continue reading...]

Wednesday, December 4, 2013

[Toturial] How to add custom favicon in Blogger – Change default Blogger favicon

Have you ever thought of removing that big B icon and adding your logo in your Blogger blog? This post is for those who wish or willing to have their logo to be displayed in where the big B holds its place. You might see this icon in many sites next above to your browsers address bar, they are called favicon.
 
For example take a look at this site displaying logo as a favicon and mostly many sites display their logo as favicon. Before knowing how to add custom favicon in Blogger let’s see what favicon is and why to add favicon in a nutshell.


Related: How to add related posts to Blogger

What is favicon? Favicon is a short form of favorite icon and it is known as website icon, tab icon or URL icon with 16 X 16 pixels related to that website.

Why to add Favicon? Be like a pro and blog like a pro. In order to show your blogs identity and uniqueness you need to remove that default Blogger icon and add your custom favicon.

Related: How to add pages and menu tabs in Blogger

How to add custom Favicon in Blogger

Adding custom favicon in Blogger is too easy. In order to change default Blogger favicon all you need is a ready made favicon of yours. You might have already created a logo for your blog. Now Go to favicon.cc and create a favicon and download the icon file.

How to add custom favicon in Blogger


Related: Social widgets for Blogger

Now login to your Blogger dashboard and go to layout settings. At the top right corner you will see favicon widget, open it to change the Blogger favicon. Upload your favicon and save it.


That’s it now try refreshing your blog and you will see your favicon instead of Blogger favicon.
Note: For best results keep the dimensions in favicon.cc and never upload jpeg, PNG files for favicon.

Hope this article helped you on how to add custom favicon in Blogger. Also check other useful tutorials for Blogger.
[Continue reading...]

[Tutorial] Create a Popup window for Blogger – Popup window code

Popup window for Blogger
 
You might notice in some websites that a popup window opens suddenly without the knowledge of you which leads to other websites and they do it for some promotional purpose.
 
It’s easy to add popup window for blogger and adding popup window helps in increasing page views of your blog and you can help visitors to know useful links within your site and other external sites.

How to create a popup window for Blogger

  1. Login to your blogger account
  2. Go to Dashboard >> layout and click “add a gadget” from sidebar or footer
  3. Open HTML/JavaScript gadget
  4. Add the following script in HTML/JavaScript content area and click save
Popup window for blogger
<script type="text/javascript">
document.body.onclick= function(){
window.open('http://likewarez.com', 'poppage', 'toolbars=0, scrollbars=1, location=0, statusbars=0, menubars=0, resizable=1, width=950, height=650, left = 300, top = 50');
}</script>
 
Note:
  1. Make sure to change the http://likewarez.com URL
  2. Customize the width and height of the popup window like you wish
Now a popup window opens pointing to that page when users click somewhere on your blog.
Check out the popup window live in action here.
[Continue reading...]

[Tutorial] How to remove “powered by Blogger” attribution in new HTML editor

 
As we all know Blogger is a free and widely used blogging platform and we are providing more tips and tricks for beginners. Here we will see about a simple trick on how to remove “powered by Blogger” attribution from your Blogger blog. People who are using Blogger platform will have this powered by Blogger attribution below their blog. It comes by default in every template and it is an official representation for Blogger. Removing powered by Blogger attribution is simple. Just follow this step by step tutorial on how to remove powered by Blogger attribution using new HTML editor.

How to remove powered by Blogger attribution

  1. Go to Blogger.com and login to your Blogger profile
  2. Select your blog that you wish to remove this attribute
  3. Now go to template and click edit HTMLHow to remove powered by Blogger attribute
  4. Here drop-down “jump to widget” option and from that list select Attribution1 as highlighted belowhow to remove powered by Blogger attribution
  5. Now in the editor press ctrl + F and find for this line <b:widget id=’Attribution1′ locked=’true’ title=” type=’Attribution’>How to remove powered by Blogger attribution
  6. Now replace the locked=’true’ in to locked=’false’ as you can see highlighted belowHow to remove powered by Blogger attribution
  7. Once done click save template
  8. Now go to layout option and at the below you can see attribution gadget, click edit.
  9. In that popup window click remove and you are doneHow to remove powered by Blogger attribution
Now go and view your site where you won’t see the “powered by Blogger” attribution.
Your copyright text is also removed along with powered by Blogger attribution. To add copyright text just click add a gadget in layout settings select HTML/JavaScript, add your copyright text and drag and drop it below.
 
Removing this powered by Blogger attribution adds uniqueness to your blog and it shows your professionalism. Hope this helped you on how to remove powered by Blogger attribution using new HTML editor. Now learn how to add custom favicon to your Blogger blog.
[Continue reading...]

[Tutorial] Difference between posts and pages in wordpress

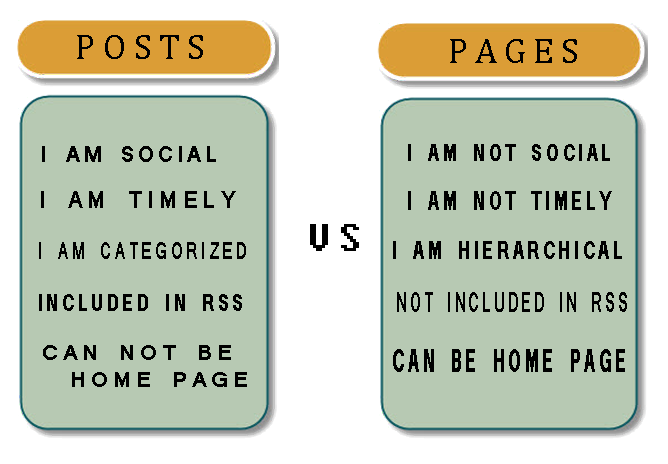
This article is for beginners who are confused with posts and pages in wordpress. You will have a doubt that both post and pages have same field, then why should i use both. Yes they are both same when it comes to look and feel ( theme & content), but there is more difference with posts & pages.


POSTS
 
Blogging is done through posts and not with pages. Each post will have a specific date & time so that the subscribed users find latest posts via RSS and it comes with categories and tags.

It works in reverse chronological order, each and every post that you are making goes in reverse order (ie new posts shows up and older posts fades down). If you have a huge number of blog posts only few recent show up and the remaining older posts you have to find in blog archives. You can share your daily posting to social networking sites, by this your site gets updated day by day.
 
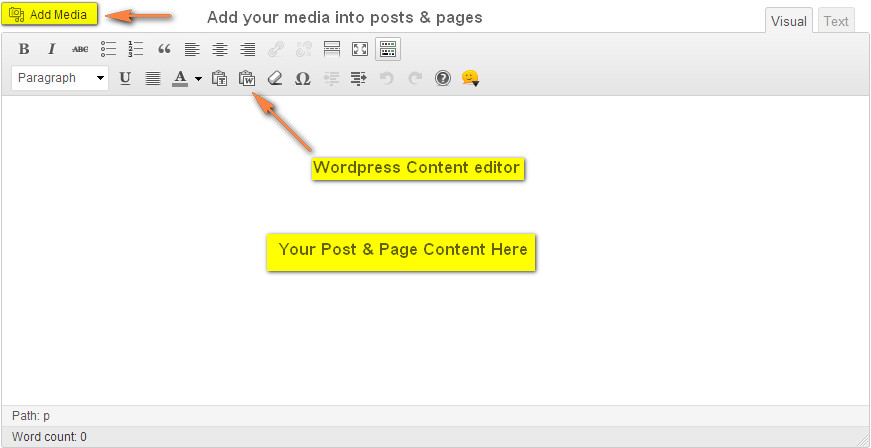
How to add a post & categories
 
Before adding a new post you must first create a category, in order to specify that the post is related to that category.
 
  1. Go to posts in your wordpress dashboard and click categories.
  2. Name the category and click add new category.
  3. Now go to all posts and click add new.
  4. Enter your post title and content
  5. Specify the category that your content is related to and click publish.You can see the published article in your blog page, which will show the posted date, time & author.
 
PAGES
 
Pages don’t have categories & tags, pages are not listed day by day like you post, they are static, pages don’t come with posted date and time, not listed in RSS, no sharing options or commenting options(but it has).
 
Will you have a commenting option in your about us and contact page of your site? no one does it. A page can have multiple sub-pages that a post don’t. Each page can have their custom layout style.
 
How to add a page
 
Adding a page is same as doing with post. Just go to page in admin panel enter your page title and content then click publish. Set the page attributes before publishing so that pages are arranged in order in the main menu. I hope you won’t get confused with posts and pages in wordpress from now on.
[Continue reading...]
 
Copyright © . Tips - Article - Tutorial For SEO/Blog - Posts · Comments
Theme Template by BTDesigner · Powered by Blogger